|
Time Reconciliation |
|

Time Reconciliation - Publish Service Reports
The Time Reconciliation report is a useful tool for a number of reasons. From this report, you can check on the status of all clients in terms of how much time has been billed, non-billed, or remains on their project or block of time. You can also publish the monthly reports to Client Administrators from one page instead of running each report to send out.
To run a full report, as with most of the report sections, leave the pull downs at the defaults and hit the Display button. This will show the time for the current month.
The options for this report are as follows:
ClientType: Select specific type or leave at default.
Client: Multiple clients can be selected by clicking on the arrow. You then click on each client you want to see while holding the Ctrl key. If you want to see all the clients, simply leave the pull down box blank.
Project: Can only be selected if a single client has been selected. If the default of all, or if multiple clients are selected, this option will not be available.
Location: The location for the client. If there are multiple locations, leaving at the default will show all locations.
Cost Center: To run this report, select the cost center and all clients with that cost center will be displayed. Multiple cost centers can be selected by clicking on the arrow, then holding the Ctrl key while selecting the options.
Show projects with less than a specified amount of hours remaining: This is an extremely useful search if you sell time by the hour. If a client is below a certain time, they may be short when requiring service. If your Admin staff knows ahead of time, a quote for additional time can be sent for approval, keeping the client from running over.
Run by Cost Center check box: Will sort the report by Cost Center rather than alphabetical by client name.
Predefined Dates: The options are This Week, Last Week, This Month (default), and Last Month.
Start Date/End Date: As with the other reports, you can specify a date range outside the predefined dates.
If you need to narrow the search even more, combine some of the options such as Client, Cost Center and Dates.
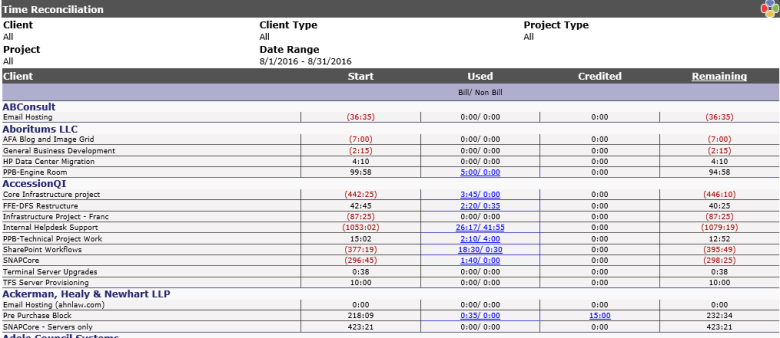
Once your report displays, five columns will appear indicating the following for the current month:
Client Name: A sub heading under each client for each project
Start: The amount of time they had at the beginning of the month. This is the carry over of their monthly service time, pre-purchased block of time, or time allotted to the project from the previous month.
Used: The amount of time billed/non-billed to the project for the month. (If non-billable time is not displayed for your system, only billed time will appear.)
Credited: Any time credits added through the Add/Manage Time Credits, or time added when a new project is added to the client. Both of these will be described in the appropriate sections of this document.
Remaining: Adds the Start time and Credited time then deducts billable time, and only billable time, from the amount. Time in red shows hours and minutes the client is over their block of time. This is the only sortable column on this report.
To print the report, click on the Print View button on the left of the screen. A separate window will open; use the print function from your browser to complete the process.
Time Reconciliation – Publish Service Reports
Service Reports show your clients how much work your staff has done for them in the past month. These reports are published so the Client Admins can view them through Revelation. The reports are described in the Ticket Details section.
To run the report, go to the Time Reconciliation link on the Reports tab. Select the specifics you need or leave the items at the Default. However, Last Month must be selected under Pre Defined Dates.
PLEASE NOTE: This function only works when Last Month is selected.
Once the report displays, there will be a column titled Publish. Some of the projects will have a red X indicating the projects are not available for the client to view on the End User Interface, and therefore cannot be published. A check indicates the report has already been published. Any projects with an open check box are available to publish.
To publish a report, check off the appropriate box. You can check all the clients at the same session or select a few at a time. Once you have selected the projects to publish, click on the Publish button. You will receive a message stating how many reports were published and if any were not successfully published. Projects that have been published will have a check mark next to them when the report is run.
Publishing a report sends an email to the client contact with a link back to their Revelation page to view the report.


